In this article I want to show you my photography equipment. I will point out on the basis of some example shots the differences between the lenses.
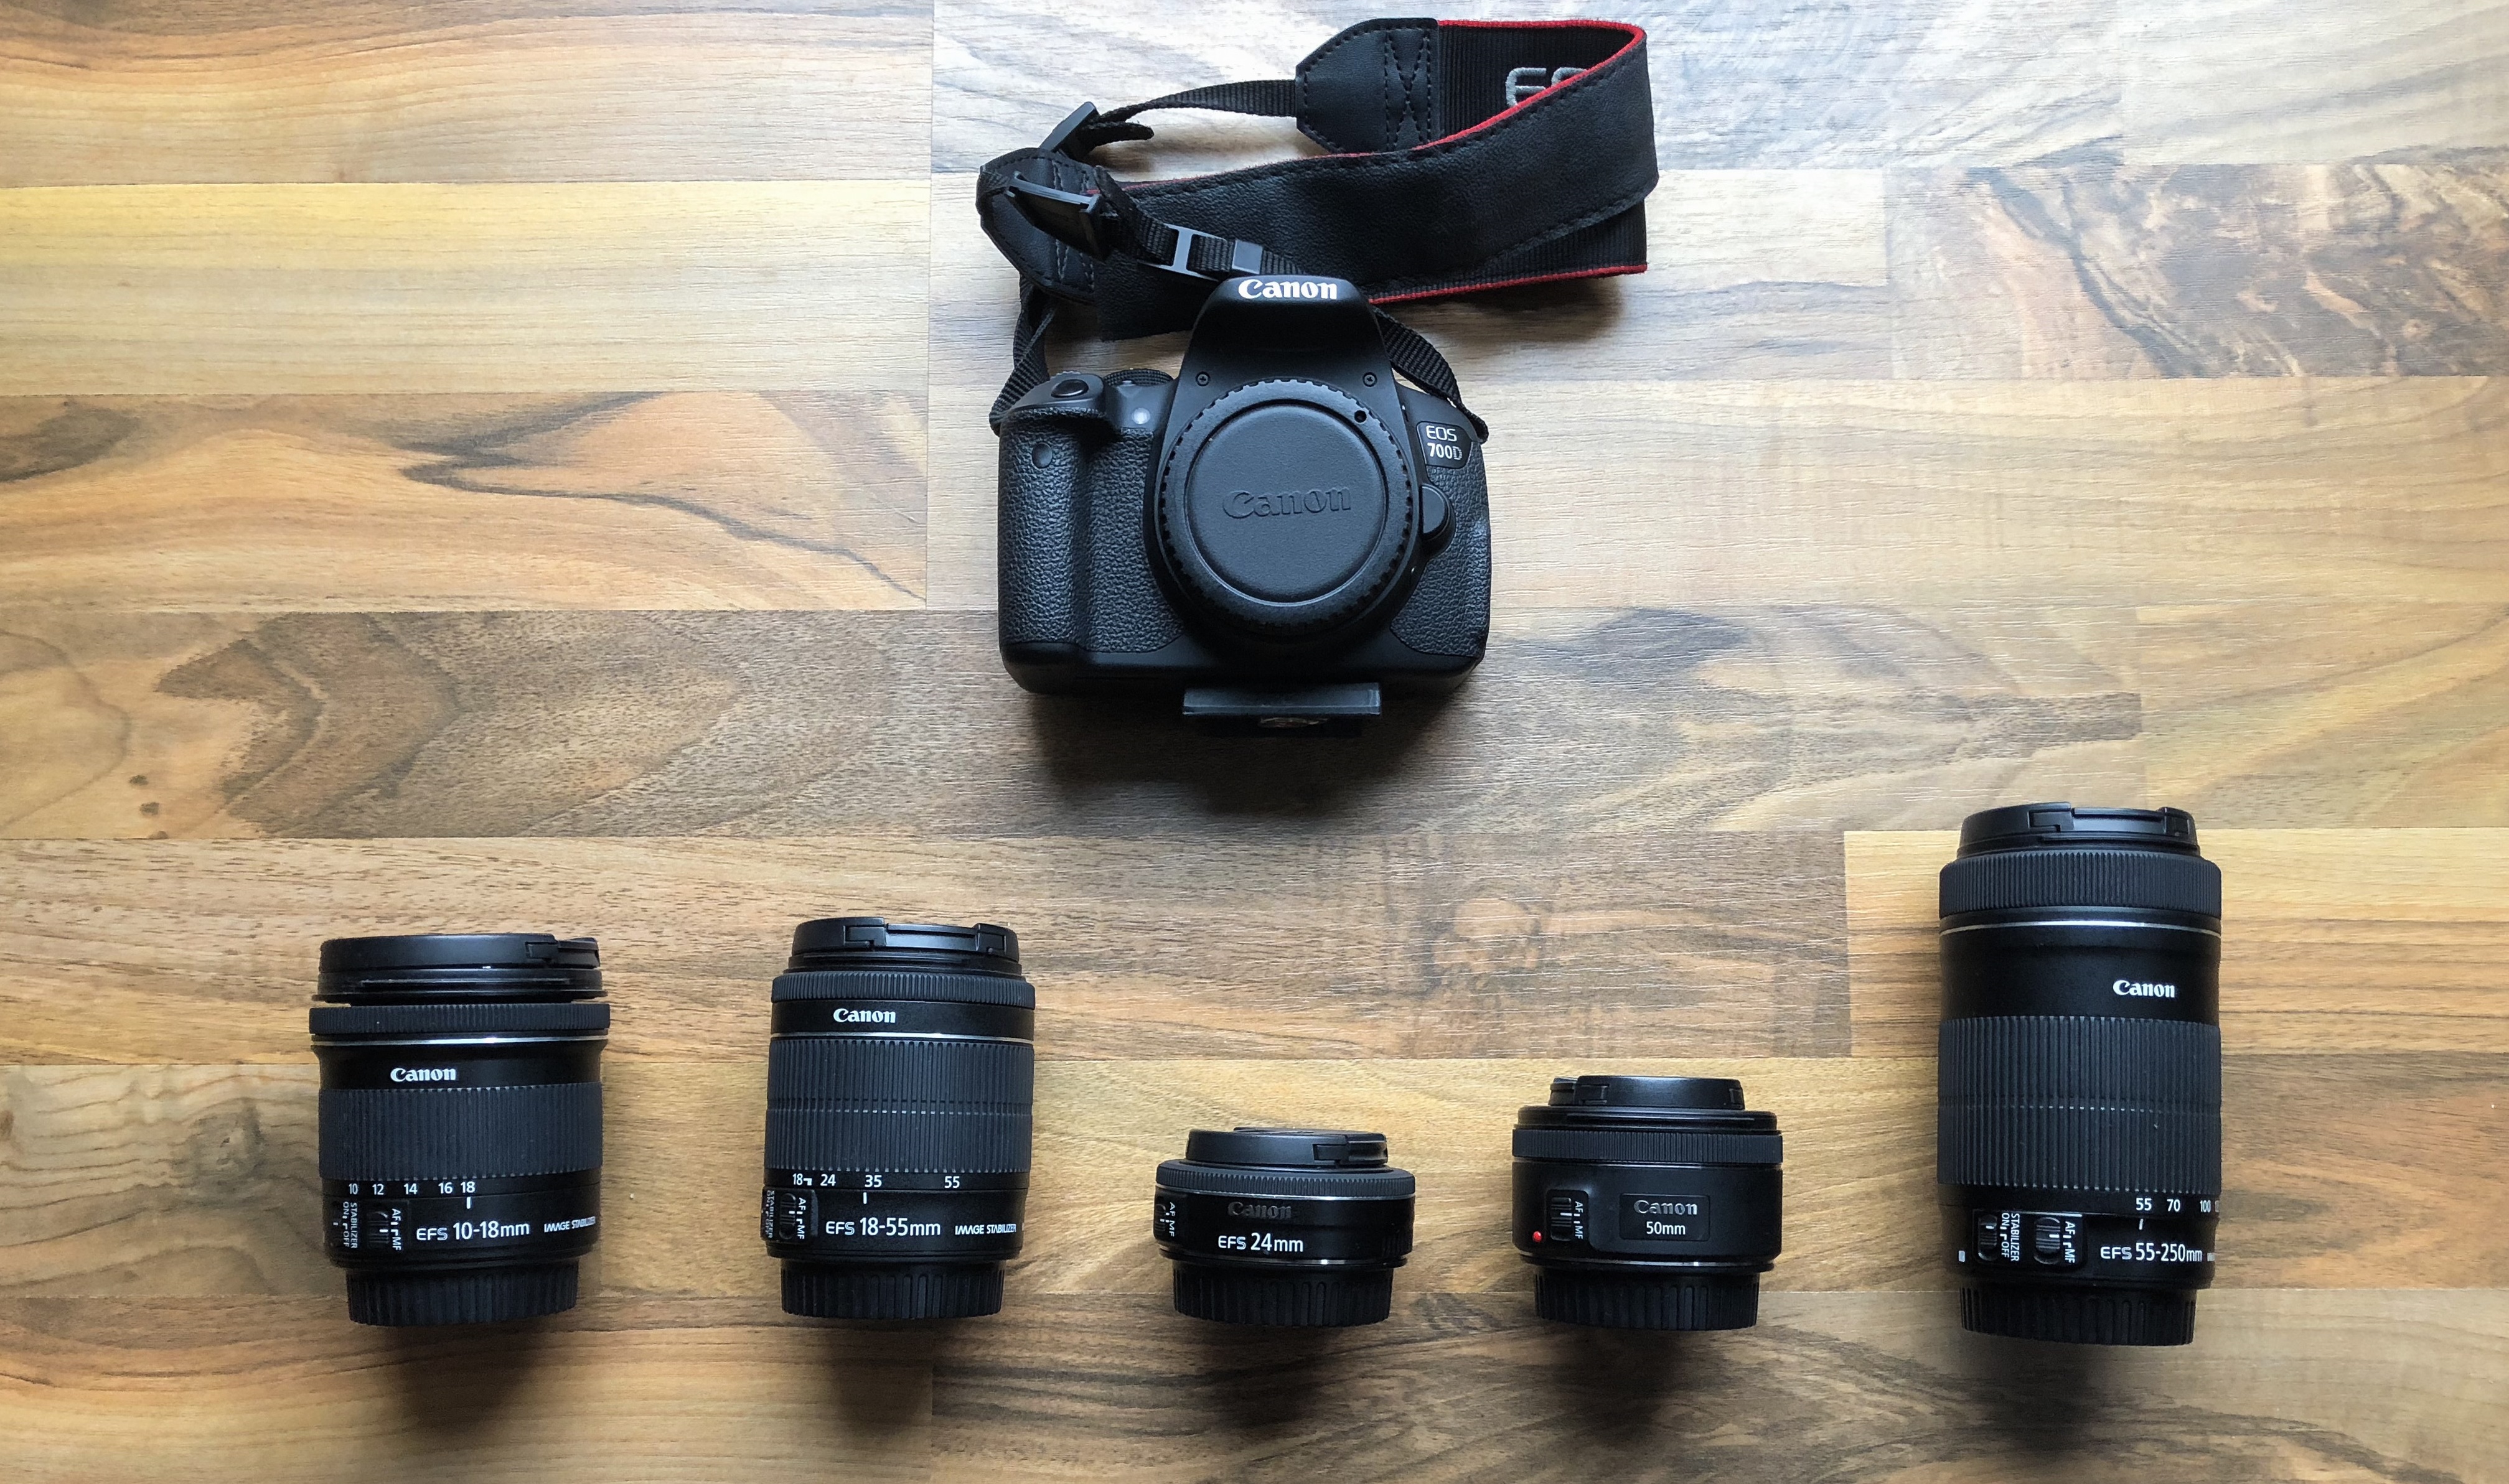
In the picture below you can see all lenses in comparison to each other. I will start from the top to bottom and describe each lens and filter from left to right. There will be links to amazon.com so you can have a look or buy some of the equipment if you are interested.

I will update the post in case I buy another lens or filter.
Here the topics I will cover in this article:
Camera
Canon EOS 700d /Canon EOS Rebel T5i

The Canon EOS 700d which is called Canon EOS Rebel T5i in the USA is my first DSLR camera. I would say that this is a very good camera for beginners but has also enough functions for advanced photographers. Therefore you don’t need to change the camera after you learned the basics. You have many automatic functions you can use at the beginning if you are overwhelmed with the manual functions. There are automatic modes for sports, landscape, macro, portrait, as well as a very good night mode and HDR. But the manual mode is there for you if you are ready to deepen your knowledge. You can adjust aperture, shutter speed, white balance and ISO on your own. Only then you can fully experience how it is to be a real photographer. Only then you will be able to make a photograph to art by using e.g. long exposure times in different situations.
It has a 18 megapixel APS-C sensor. There are of course technically much better cameras out there. There are cameras that can cost you a lot of money. But if you need something to begin with, it should be a very good camera for you.
There are successors of this model with similar features like EOS Rebel T6 or EOS REBEL T7i that should be interesting as well.
I chose a Canon over a Nikon DLSR because it was easier for me to understand all the settings. Canon – for me – has a more intuitive handling. But this is only my opinion. I would recommend you to go to a store and play around with different cameras just to find outwhat you like most.
Lenses
During the first 2 years of working with my Canon I bought several lenses for it. If you have a similar camera it is important that you buy the ‘EF’ or ‘EF-S’ lenses. These are the lenses that fit the camera. ‘EF-M’ lenses only fit the mirrorless cameras, so be aware of that.
Canon EF-S 10-18mm f/4.5-5.6 IS STM

This is ‘the’ lens for landscape photography. This was the lens I bought first because I wanted to know what is possible with wide angle shots. With this lens you will get much more space into your frame. This is what you want if you have a beautiful panorama you want to capture. But not only this. With such a lens you can go very close to the object and still have the surroundings in your frame. This looks fantastic if you want to accentuate an object in your composition like a tree, a house, a car or other objects of your interest. This gives the picture more dynamic and feels more like the observer is in the situation the picture presents.


Canon EF-S 18-55mm f/3.5-5.6 IS STM

The 18-55mm lens was included with the camera I bought. It is the best lens for beginners. You can do a variety of things with it. 18mm is a wide angle and you can realize very good indoor and landscape photography. The 55 mm is great for portraits and some macro shots. This is also the perfect lens to find out what you want to photograph in the future. Are you using the 18 mm adjustment more often than the others? Then you can think of buying a fixed wide angle or the 10-18mm or maybe a fisheye lens. Or do you want to photograph more details and are more interested in investing into a macro lens?


Canon EF 50mm f/1.8 STM

Oh, the 50 mm lens. This is true love! I bought this lens right after the 10-18 mm lens and didn’t regret it for a second. It is amazing what you can do with it. You would think – 50 mm is included in the 18-55mm so what’s the deal? It is the aperture that makes the difference here. The aperture for this lens is f/1.8 which captures a lot of light. This means that you are able to make the object in the foreground appear sharp but at the same time the background is blurred. The desired ‘bokeh’ starts to appear when light becomes diffuse. This makes the lens a perfect lens for portraits of any sort. If the aperture reaches about f/4.0 the background appears sharp again. This is very useful if you want to take some ‘cut-outs’ from your panoramic picture to see more details. Details in general like flowers or small objects can be captured very well with this lens as well.


Canon EF-S 24mm f/2.8 STM

The 24 mm lens is my newest investment. It is also called the ‘pancake’ lens because it is very compact, flat and light ( 4.4 oz. / 125 g ). This makes the lens perfect for travelling or just for a city trip where you don’t want to take much stuff with you. It is a compromise between a wide angle lens and a wide aperture. You are able to create wonderful city and landscape photographs but can use the lens also if you want to focus more on the details. f/2.8 is great for pictures that acquire more light. The sharpness of the lens is also overwhelming. A fixed-optical length lens like this or like the 50 mm lens that I showed you before have the advantage that the sharpness is superior. It is less flexible because you can’t zoom and you have to think more about the composition of your picture. Instead of the lens, you have to move yourself back and forth to find the perfect perspective. This is challenging and therefore great to improve your photography skills.


Canon EF-S 55-250mm f/4-5.6 IS STM

The last lens I want to introduce to you is the telephoto lens ‘Canon EF-S 55-250mm f/4-5.6 IS STM’. This is the perfect lens for animal and sports photography. I bought it shortly before my trip to the Seychelles to capture all the wild animals that live there. This was a great investment and really worth it. This lens is big and quite heavy and there are better telephoto lenses of Canon like for example the professional quality L-series. But they are even heavier (over 2 pounds) and very expensive . Therefore I thought it would be best to invest in a more hobby adequate lens and the ‘Canon EF-S 55-250mm f/4-5.6 IS STM’ fulfills this criteria.
I did some wonderful animal shots with it. This lens is also useful for capturing the moon or any other distant object. There is another tipp for how you can use this lens or all lenses above 40mm. You can use several layers as a composition to make the shot more interesting. The picture looks more structured and dimensional in this way. You will find an example picture below.


Below I summarized some technical data of the five lenses I mentioned in the post in the following table:
| Canon EF-S 10-18mm f/4.5-5.6 IS STM | Canon EF-S 18-55mm f/3.5-5.6 IS STM | Canon EF 50mm f/1.8 STM | Canon EF-S 24mm f/2.8 STM | Canon EF-S 55-250mm f/4-5.6 IS STM | |
| weight | 8.5 oz. 240 g | 7.2 oz. 205 g | 5.6 oz. 160 g | 4.4 oz. 125 g | 13.3 oz. 375 g |
| dimensions | 2.8 x 3 x 3 in 7,2 x 7,5 x 7,5 cm | 3 x 2.7 x 2.7 in 7.5 x 6,9 x 6,9 cm | 1.5 x 2.7 x 2.7 in 6,9 x 3,9 x 3,9 cm | 0.9 x 2.7 x 2.7 in 6,8 x 2,3 x 2,3 cm | 4.4 x 0.1 x 2.8 in 24,8 x 12,2 x 11,8 cm |
| filter size | 67 mm | 58 mm | 49 mm | 52 mm | 58 mm |
| stabilizer | yes | yes | no | no | yes |
| auto focus | yes | yes | yes | yes | yes |
Filters
In this section I will describe very briefly why filters are useful and what kind of pictures you can make with them. These are some of the different kinds of filters used in photography:
- Linear & Circular Polarizers: reduce reflections/glare from windows or water and improve saturation of e.g. the blue of the sky.
- Neutral Density (ND) filters: reduce the intensity of light and therefore extend the exposure time.
- Graduated Neutral Density (GND) filters: control light gradients and are used especially in landscape photography to get a darker color of the sky
- UV / Haze filters: provide lens protection and improve clarity
I have mainly ND filters and one polarization filter. ND filters are great if you want to make long exposure pictures during the day. Because the light is too bright you would get a totally white picture if you just slow down the shutter speed. You have to make the picture darker so that your object is well exposed. ND filters do exactly this. They darken your composition so you can use a slower shutter speed. This is especially important if you want to capture the motion-blur of a waterfall or the movements of clouds in the sky.
Of course it is possible to create long exposure photographs without a filter. But this is only possible at evenings/mornings or at night, when the frame is not overexposed due to too much sunlight.
Before you buy a filter you have to know some things about them. First you have to buy filters matching the diameter of your lens. I listed the filter size for each lens in the table above. It is recommended to buy a filter for a lens with the largest diameter. In my case it is 67 mm. It is easy to step down the size to smaller lenses using some ring adapters (for example here).
It is also important to know what ND2, ND8 and so on means in relation to shutter speed. I attached a table below that shows how the shutter speed can be slowed down by different filters. The polarizer can also be viewed as a filter and acts like a ND filter between ND2 and ND4.
| filter | optical density | reduction in stops | 1/1000 s | 1/250 s | 1/60 s | 1/15 s | 1/4 s | 1 s |
| Polarizer | up to 0.5 | up to 1.67 | 1/320 s | 1/80 s | 1/20 s | 1/5 s | 1.3 s | 3 s |
| ND2 | 0.3 | 1 | 1/500 s | 1/125 s | 1/30 s | 1/8 s | 1/2 s | 2 s |
| ND4 | 0.6 | 2 | 1/250 s | 1/60 s | 1/15 s | 1/4 s | 1 s | 4 s |
| ND8 | 0.9 | 3 | 1/125 s | 1/30 s | 1/8 s | 1/2 s | 2 s | 8 s |
| ND16 | 1.2 | 4 | 1/60 s | 1/15 s | 1/4 s | 1 s | 4 s | 16 s |
| ND32 | 1.5 | 5 | 1/30 s | 1/8 s | 1/2 s | 2 s | 8 s | 30 s |
| ND64 | 1.8 | 6 | 1/15 s | 1/4 s | 1s | 4 s | 16 s | 60 s |
| ND100 | 2 | 6,67 | 1/10 s | 1/2 s | 2.5 s | 10 s | 40 s | 160 s |
| ND256 | 2.4 | 8 | 1/4 s | 1 s | 4 s | 16 s | 60 s | 4 min |
| ND400 | 2.6 | 8,67 | 1/5 s | 1.6 s | 6 s | 25 s | 100 s | 6 min |
| ND500 | 2.7 | 9 | 1/2 s | 2 s | 8 s | 30 s | 2 min | 8 min |
| ND1000 | 3 | 10 | 1 s | 4 s | 16 s | 60 s | 4 min | 15 min |
You don’t need to buy all of the filters. It is sufficient to have 2-4 filters and combine them to create a stronger effect. Every filter can be mounted on each other easily . I purchased the following filters:


There are variable filters (here or here) if you don’t want to buy several filters. I don’t have experience with them therefore I can’t say if a variable filter works well or not.
Finally I want to show you some example shots from my trip to Turkey where I used the filters.


Software
Like most hobby photographers I use editing tools. I use the ‘Photography plan’ package from Adobe that contains both Lightroom and Photoshop (here) where you have to pay about 10 $/month for a one year contract. This may sound like a lot of money if you sum it up but I think it is worth it regarding the quality these tools have. You get all updates and new features with this subscription. Since I work for a software company I know how important it is to be up to date. You just can’t support software that is older than, say, one year and fix the issues because there were too many changes in between. The software gets more complicated and the risk of screwing up new and updated software developments rises.
If you are wondering why editing software is necessary you may also try a demo version of lightroom. But it is important to know first that there is a special format called ‘RAW’ that you have to enable in your camera first. The RAW files are much bigger than normal JPEG files and contain a lot more information like white balance, contrast, saturation and so on. If you don’t have perfect light conditions for your picture it is amazing what you can do with editing. You can make colors more vibrant, change the perspective, make lens corrections (this is especially important for wide angles where you are getting effects similar to a fisheye lens).
You also have to be aware that the human eye is much more sensible than a camera. This is why we often can’t get the same images we have seen in real life. Otherwise photography is a form of art and it should be up to the artist to decide how he wants his picture to be seen. If he wants it to be black and white he will create a very different feeling than with a picture with very saturated, juicy colors.
I will give you some examples. The following pictures were edited with Lightroom only:


You can see with these examples that the editing makes your pictures more professional. Sometimes even I wonder myself what gems might be hidden in my gallery before I use different editing techniques and play around with what fits best. If you have the possibility to make your pictures more beautiful, why shouldn’t you?
I hope this article explains how different camera equipment can help to create interesting pictures. Maybe this helps you to decide what camera, lens or filter to use in order to advance your photography skills.
If you want to share your experiences and thoughts about your photography equipment or about this article, don’t hesitate and write a comment below!
Be First to Comment